“Envelope Basics: Measuring – Part 1” is part of an occasional series titled “Envelope Basics” that provides an in-depth look at all-things envelopes – elements, measurements, ordering tips and more*.
Measure an envelope. What seemed like an easy enough task when I started working at Tension turned out to be a bit more complicated. I quickly learned a few truths:
- Envelopes can be referred to by their size (e.g., #9 envelope, #10 envelope), but for the customer envelopes that Tension produces, the precise measurements can vary.
- There’s a right and many, many wrong ways to measure an envelope.
- When envelope’s measurements are properly specified, it could reduce the processing time of an order.
Surely, I’m not alone in my envelope size naivety. This blog on how to properly measure an envelope is dedicated to all of you industry newcomers, and our seasoned colleagues looking for a refresher course.
Pre-measurement Checklist
- Be sure the envelope is empty before you measure it.
- Use a legitimate scale or ruler.
- Place the envelope on a flat surface.
- Capture the measurements to the nearest one-sixteenth of an inch.
Common Envelope Sizes
Tension produces custom envelopes based on your specific requirements, so to us there is no “standard size” envelope. Between our Business, Booklet and Catalog envelopes, there are a variety of envelope sizes you may be familiar with. Learn more about these sizes by clicking here.
How to Measure an Envelope
Event though envelopes are measured from the shortest dimension first, this does not differentiate the height from the width. If an envelope has the seal flap at the top, the dimension from the bottom fold to the top fold is the height. Follow the steps below on how to perfectly measure an envelope:
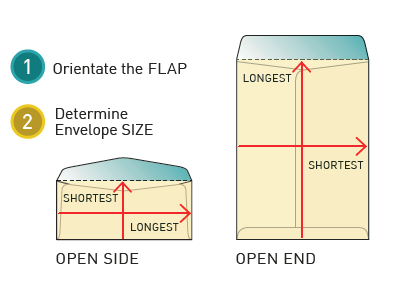
Step 1. Orient the Flap
To determine the type of envelope you’re measuring (e.g. open side or open end), orient the flap at the top. If the flap is on the widest side of the envelope, it is an open side envelope. If the flap is on the narrowest side of the envelope, it is an open end envelope.
Step 2. Determine the Envelope Size
Important: measure and state shortest side first, then the longer side.
Step 3. Identify the Score
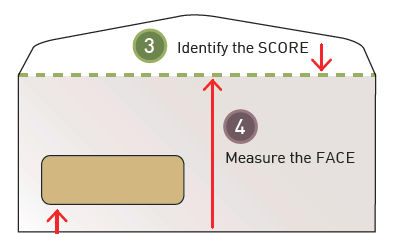
Find the groove in the paper where the flap fold is made.
Step 4. Measure the Face
Measure from the bottom of the envelope to the top of the envelope at the score.
Step 5. Measure the Seal Flap
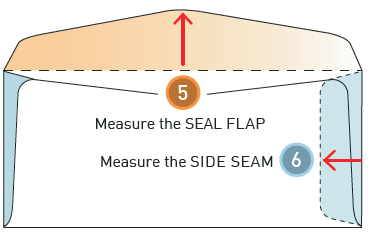
Flap length is measured from the centermost part of the seal flap to the flap score.
Step 6. Measure the Side Seam Width
The side seam is the area that holds the back to the face of the envelope. The envelope must be fully unfolded and open to reveal the inner seam and properly measure it.

Step 7. Measure the Throat Depth
Throat depth is measured from the bottom of the envelope to the top of the back of the envelope at its centermost point.
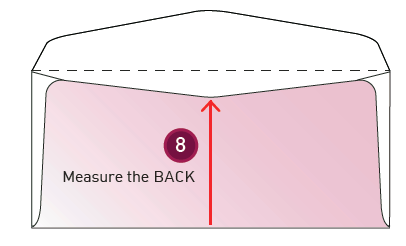
Step 8. Measure the Back
The back is measured from the bottom of the envelope to the center of the top (the lowest point on the envelope).
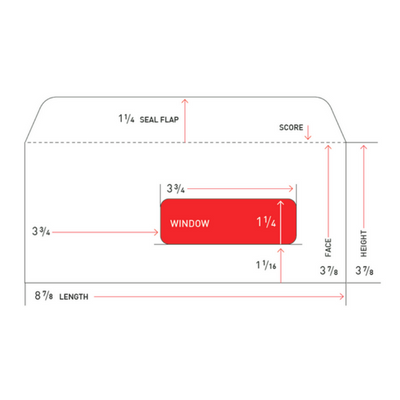
Step 9. Take Window Measurements
Stay tuned for Part 2 of this blog to learn how to measure a window envelope.
Download Our Guide
Envelope Basics is a complete guide that details everything you need to select, measure and order the right envelope for your mail campaign.
Whether you’re a seasoned mailer or new to the mail industry, Envelope Basics includes helpful tips for your business or organization. Download your copy of Envelope Basics here.
As always, consult your Sales representative to ensure accurate measurements. Don’t have a Tension Sales Rep yet? Contact us today and we’ll put you in contact with an envelope expert in your area.
*This blog is intended for informational purposes only. Exact envelope and/or print specifications should be discussed in detail with your Sales Representative.